- Open menu Run, select item Debug Configurations.
- In the left area of the appeared window double click on Remote Java Application
- Enter all required information about your server. In the screenshot below you can see configurations for the server configured here
- Click Apply or Debug
Showing posts with label debug. Show all posts
Friday, August 31, 2012
Debug remote application with Eclipse
When you have remote application with enabled debug it is easy to connect Eclipse IDE and debug the application. Here is the list of steps for it:
JBoss remote debugging
As all you well know debugging is very important part of the development process. In this post I will show you how to configure your JBoss AS to allow debugging deployed applications.
We need to configure JBoss's bin/run.conf file. Add the following line at the end:
This options mean:
You may also want to check how to debug remote application with Eclipse
We need to configure JBoss's bin/run.conf file. Add the following line at the end:
JAVA_OPTS="-Xdebug -Xrunjdwp:transport=dt_socket,address=8787,server=y,suspend=n $JAVA_OPTS"
This options mean:
- -Xdebug asks JBoss to work with debugging support
- -Xrunjdwp loads JDWP (Java Debug Wire Protocol). This option has its own options:
- transport=dt_socket means that sockets will be used for transport
- address=8787 means the address(in this case it's the local machine's port 8787) where the socket will be opened
- server=y if it is set to 'y' then it means that JBoss will listen for debugger to attach; if it is set to 'n' then it means that JBoss will attach to the debugger at the specified address
- suspend=n if it is set to 'y' then it means that JBoss will be launched in the suspended mode and will stay suspended until the debugger is connected
You may also want to check how to debug remote application with Eclipse
Sunday, October 23, 2011
Conditional breakpoints in Eclipse
There is a very useful feature in many IDEs, that makes bug fixing much easier. I'm talking about conditional breakpoints. But unfortunately in Eclipse IDE its location is quite unintuitive
So to put conditional breakpoint you should:
- Put usual breakpoint. It may be done by clicking on the left margin of the editor or pressing Ctrl+Shift+B while you're on the line.

Figure 1. Breakpoint marker in the left margin of the editor - Right click on the breakpoint marker int the editor's left margin and select "Breakpoint properties..."
- In the appeared window tick "Conditional" and enter your condition in the editor. Note that key assist is available in this editor.
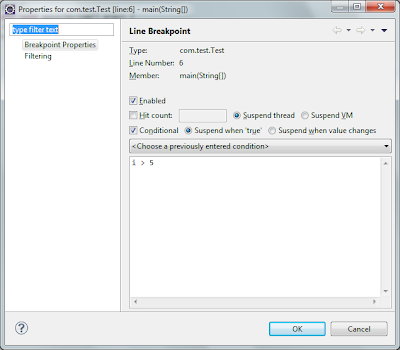
- If you want to stop every time expression returns true then select "Suspend when 'true'"
- If you want to stop only when expression changes its value then select "Suspend when value changes"
- Press OK. Note the breakpoint marker has changed.

![]() |
| Figure 2. Breakpoint properties window configured for conditional breakpoint |
![]() |
| Figure 3. Conditional breakpoint marker in the left margin of the editor |
Subscribe to:
Posts (Atom)


